Kitchen layouts are usually chosen the wrong way round. People fall for a photograph of a big island, then try to squeeze one into a room that can’t carry it, and end up with a kitchen where two people can’t pass each other. The shape of the room, the position of the plumbing, the number of people who cook and how you actually cook should pick the layout. The look comes after. Below I’ll compare the five shapes people argue about (one-wall, galley, L-shaped, U-shaped and island), give you the measurements that decide whether each one works, and cover the facts that glossy guides skip: landing space, ventilation, corner storage, door swings, plumbing and cooking habits.
Before You Choose a Shape: Four Numbers That Decide Everything
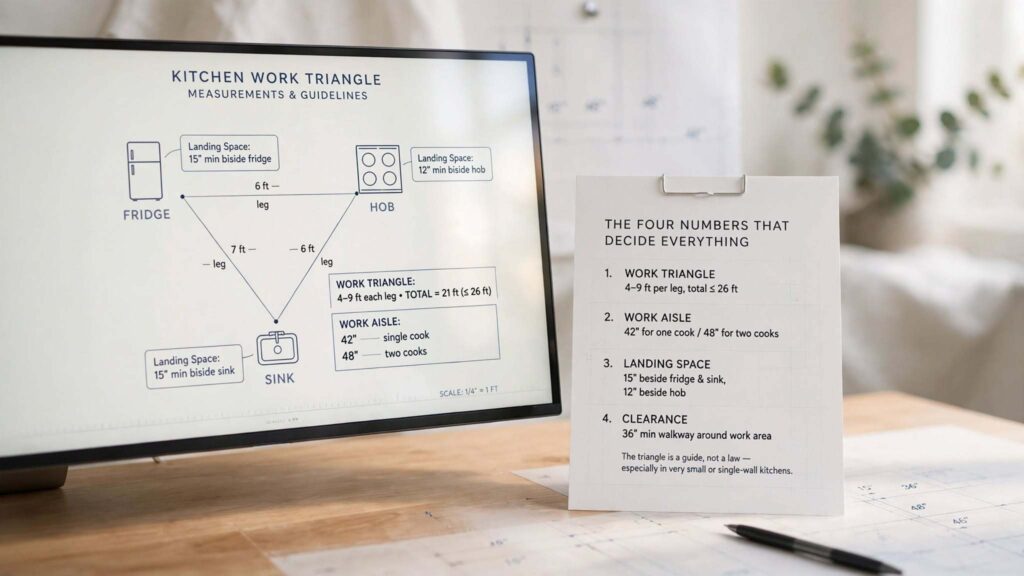
Every layout is judged against a handful of clearances. They come from the National Kitchen & Bath Association (NKBA), whose planning guidelines most designers use as a reference, and they’re worth knowing before you look at a single drawing. They’re guidelines, not building codes, but they’re based on how people really move.
| What | Guideline | Why it matters |
|---|---|---|
| Work aisle (between counters, tall units and appliances) | At least 42 in (1,065 mm) for one cook, 48 in (1,220 mm) for two or more | Room to work, bend and open doors |
| Walkway (a path that isn’t a work area) | At least 36 in (915 mm) | Room to pass |
| Work triangle (sink, hob, fridge) | Each leg 4 to 9 ft (1.2 to 2.7 m), total no more than 26 ft (7.9 m) | Keeps walking short without crowding |
| Traffic | Major household traffic shouldn’t cross the triangle | No one walking through the cook |
Two details people forget. The triangle is a planning guide, not a law, and in very small kitchens (roughly under 100 square feet) or in single-wall and galley kitchens, zone planning adds complexity without adding value, so the triangle is the right test for compact single-cook rooms. And for U-shaped plans, NKBA’s access standards call for about 60 inches (1,525 mm) between opposing runs if someone using a wheelchair needs to turn.
Then there’s landing space, the clear counter next to an appliance where you put things down. Planning guides give roughly 15 to 24 inches next to the fridge, about 12 to 15 inches at each side of the hob, and 18 to 24 inches by the sink, with at least 300 mm of counter beside the sink and 400 mm beside the hob in metric guidance. Without landing space, hot pans end up wherever there’s room, which is rarely safe.
Standard base cabinets are about 600 mm (24 in) deep with a 900 mm (36 in) counter height, though counter heights in many Indian kitchens run closer to 800 to 900 mm, so match the height to the people who cook.
Kitchen Layouts at a Glance
| Layout | Comfortable room size | Best for | Cooks | Storage | Biggest trade-off |
|---|---|---|---|---|---|
| One-wall | About 10 ft (3 m) of wall length | Studios, open-plan flats, narrow rooms | One | Limited | Long walk between appliances |
| Galley | About 7×10 ft (2.1×3.0 m) and up | Narrow rooms, small homes, single cook | One, sometimes two | Good per m² | Feels like a corridor if traffic passes through |
| L-shaped | About 10×10 ft (3×3 m) and up | Open-plan homes, medium rooms | One to two | Good | Blind corner storage is awkward |
| U-shaped | About 10×13 ft (3×4 m), some say 9×10 ft at a squeeze | Serious cooks, maximum storage | One to two | Highest | Feels enclosed in small rooms |
| Island (added to L, U or one-wall) | About 12×12 ft (3.6×3.6 m) and up | Large, social kitchens | Two or more | Good, plus seating | Squeezes aisles in rooms that are too small |
Room sizes vary a little from source to source, so use them as starting points and test your own room.
The One-Wall Kitchen
Everything sits along a single wall: fridge, sink, hob, counters, usually with wall units above. It’s the layout of studios, loft flats and open-plan living spaces where the kitchen is a feature of one wall.
What it does well. It’s compact, it’s cheap (the least cabinetry and the simplest services), and it keeps the rest of the room free. In an open-plan home it can almost disappear behind a pair of folding doors or a sliding screen.
What to watch. There’s no real triangle, because the three points are in a line, and the walk from fridge to hob can get long if the wall is much over 4.5 m. Counter space is tight, so keep the sink in the middle, with landing space on both sides, and put the hob and fridge at opposite ends, not side by side. Storage is limited, so use tall units and wall cabinets to the ceiling.
How to make it better. Add a small island or a movable trolley to double the prep area. Our guide to movable kitchen islands and appliance garages shows how to add flexibility without building in a fixed island. Keep a wall length of at least about 3 m, and think hard about ventilation if the kitchen is open to a living area.
The Galley Kitchen
Two parallel runs of units with a walkway between them. It’s the layout of ship kitchens and restaurant lines, and for one cook it’s among the most efficient.
What it does well. Everything is within a step or two. In a narrow room, it uses every inch, gives plenty of counter and storage per square metre, and keeps the work area compact. It suits small homes and one-person kitchens.
What to watch. The aisle needs to be at least 42 to 48 inches (1,065 to 1,220 mm) wide, so the room needs to be roughly 2.4 m wide at minimum (two 600 mm runs plus a 1,200 mm aisle). Narrower than that and doors, drawers and dishwasher doors collide. If the galley is also a through-route between two rooms, anyone walking through crosses the cook, and the efficiency disappears. A galley with one closed end is much calmer than one with both ends open, because it creates a dead end for traffic. Note that NKBA’s guidance says that where household traffic must regularly pass through a galley, it needs at least 48 inches between counters.
How to make it better. Put a window or glazed door at the closed end for light and ventilation, keep the hob away from the entrance, and use light colours to stop it feeling like a tunnel. If you want colour, our piece on calming kitchen palettes explains how to judge a shade in a narrow space.
The L-Shaped Kitchen
Two adjoining walls form an L, with the fourth sides left open. It’s the most common layout in homes, and for good reason: it’s flexible.
What it does well. It gives you plenty of counter and storage, a clean triangle away from household traffic, and an open side that connects to a dining table or living space. You can add an island, a peninsula or a dining nook later without redesigning the room. A good starting room is about 10×10 feet, with 10×13 feet more comfortable for a serious cook.
What to watch. The corner. Blind corner cabinets waste space and swallow things whole, so plan a corner carousel, a pull-out system or angled drawers at the start, as retrofitting them later is harder and more expensive. Keep the legs of the L sensible, because a run much beyond four and a half metres means a lot of walking. And don’t put the sink or the hob right in the corner without enough landing space either side.
How to make it better. Put the sink and the hob on different legs, the fridge at the end of one leg where it doesn’t block traffic, and use the open side for a table or island. If the room is big enough, an L with an island makes a very workable family kitchen.
The U-Shaped Kitchen
Three walls of units form a U, with the cook standing in the middle. It has the most storage and counter space of any layout and keeps the three work centres close.
What it does well. It’s the best layout for a serious cook, or two cooks working on different tasks. You can put the sink on the base of the U, the hob on one arm and the fridge and a prep zone on the other, and everything is within a step or two. There’s plenty of space for appliances, a double oven, a wide sink and an eating counter on the end.
What to watch. In a small room it feels like a cage. The gap between opposing arms should be at least 42 to 48 inches, and 60 inches if you want wheelchair access or two cooks passing, which means a room about 2.4 to 2.75 m wide at the minimum, and more is better. U-shapes also create two inside corners, so you have to solve corner storage twice. Be careful with the entrance: if the open end faces the main door, anyone walking in meets the cook.
How to make it better. Use one arm as a peninsula or breakfast bar to open the plan, add a window at the base of the U for light, and consider a shorter arm if the room is tight. A U with a peninsula is a good way to get a social kitchen with built-in boundaries.
The Island Kitchen (and Its Cousin, the Peninsula)
An island isn’t a layout on its own. It’s an addition to a one-wall, L-shaped or U-shaped plan, and it’s the most overused idea in kitchen design.
What it does well. A good island adds prep space, storage and seating. It becomes the place where homework, cooking and conversation meet. If you place the sink or hob in it, it can shorten the work triangle. In a big, open-plan space it divides the cooking zone from the living zone without a wall.
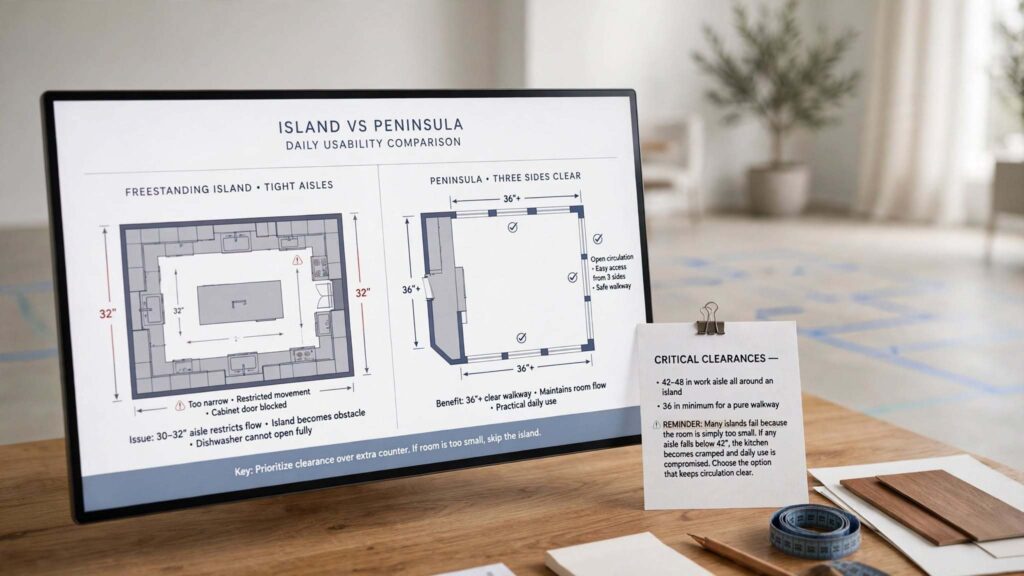
The numbers that matter. You need at least 42 inches (1,065 mm) of clear aisle on every side for one cook, and 48 inches (1,220 mm) for two, measured from the island edge to the face of the opposite counter or appliance. A walkway that isn’t a work area can be 36 inches. Island depth is typically 24 to 30 inches as a minimum for prep, with a 12 to 15 inch overhang for stools and 36 to 44 inches of clearance behind seats depending on traffic. Check the door swing between the island and the fridge, which can clash within a gap that’s too small. As a rule of thumb, you need a room of about 12×12 feet or larger for a real island.
What to watch. The common failure is aisle compression, where a too-big island leaves you squeezing between it and the counter, turning a prep asset into a daily bottleneck. A peninsula, an island fixed to one end of the run, can recover roughly four feet of usable floor compared with a freestanding island, and it keeps the aisle clear on three sides. It’s a good answer for medium rooms.
Putting a sink or hob in the island adds plumbing, drainage, power and ventilation, which means digging up the floor and a hood or downdraft system. Many people underestimate that cost. If you do put a hob in the island, plan ventilation carefully, since a ceiling-hung hood in an open room needs a clear path for ducting.
Facts Most Guides Skip
These are the details that decide whether a layout works in daily use.
Where the hob goes. Keep it away from doors and open passages, so no one brushes past a pan handle. Leave at least 300 to 400 mm of counter on each side, don’t put it directly beside the fridge, and keep curtains and tea towels away. Place it with a clear view of the room if you have children.
Ventilation. A hood that vents to the outside is far more effective than a recirculating one, and the width should at least match the hob. Mounting heights are usually quoted around 650 mm above electric or induction hobs and about 750 mm above gas, but follow the manufacturer’s instructions. In open-plan homes, extraction matters more, because smells and grease spread into soft furnishings.
Plumbing and gas. The most expensive kitchen layout is the one that moves the sink, the drain and the gas line. If you can keep the sink on the existing stack and the hob near the existing gas or electric supply, you can save a lot. That’s often the real reason one layout beats another in a renovation.
Corner storage. In L and U kitchens, corners are notoriously difficult to use. Decide on carousels, pull-outs or angled drawers at the design stage.
Door and drawer clashes. An open dishwasher, an open oven door and a fridge door can block each other, and corner drawers can hit the handles on the next run. Draw the door swings at full open.
Power and lighting. Plan sockets above counters, in the island and at the appliance garage. Add under-cabinet lighting, since overhead lights cast shadows on the work surface as you lean over it.
Windows and light. A window over the sink gives light and a view, but think about the position relative to the sun. Our house orientation guide explains why an east- or north-facing kitchen is often more pleasant for daily cooking.
Accessibility. If anyone might use a wheelchair or walker now or later, plan wider aisles, lower work surfaces, a sink with knee clearance and a turning space, as in NKBA’s access standards. Our accessible bathrooms guide explains how to measure for turning space and reach, and the same logic applies in the kitchen.
How You Cook Changes the Layout
Most kitchen advice assumes light cooking. If you fry, temper spices, steam heavily or cook for a joint family every day, the layout has to cope with heat, oil and humidity.
- Heavy ventilation matters most. Put the hob on an external wall if you can, so the duct is short and straight, and choose a powerful hood.
- Think about separation. Many Indian homes use a main kitchen with a separate utility or “wet” kitchen for washing, soaking and messy prep, and in smaller homes a semi-open design with a counter or sliding door gives visual connection while keeping smell contained.
- Two cooks need more room. If two people regularly cook together, plan 48 inches or more between runs, and two work zones, so each person has a sink or prep surface.
- Plan storage for how you cook. Deep drawers for heavy pans, tall units for grains and containers, and a handy spice drawer next to the hob.
- Gas safety. Keep gas cylinders or pipes in a ventilated area, away from ignition sources and not under the sink, and follow local safety rules.
Some households also place the hob according to Vastu tradition (often with the cook facing east), and it’s worth discussing with your designer how that fits with ventilation, plumbing and the actual shape of the room.
Which Layout for Which Room
| Your room | Start with | Why |
|---|---|---|
| Very narrow (under about 2.4 m wide) | One-wall or galley | Aisles can’t fit on both sides |
| Narrow, 2.4 to 3.0 m wide | Galley | Efficient, two runs and a good aisle |
| Small square (10×10 ft) | L-shaped | Open, easy to use, good triangle |
| Medium (10×13 ft) | L-shaped or U-shaped | More storage, optional peninsula |
| Large and square (12×12 ft or more) | L or U with island | Enough room for 42 to 48 in aisles |
| Open-plan with living area | L with peninsula or island | Separates cooking from living |
| Kitchen is a through-route | Open L, or galley with one closed end | Keeps traffic out of the work area |
| Studio flat | One-wall with trolley | Smallest footprint |
If you’re also deciding how the kitchen sits in the plan of a whole home, our 2 bedroom house plans guide explains where kitchens fit in compact layouts.
Test Your Kitchen Layout Before You Order
Don’t trust a drawing alone. A ten-minute test saves thousands.
- Tape the units on the floor. Mark every cabinet and appliance at full size with masking tape, 600 mm deep.
- Use cardboard boxes for the fridge, the oven and the island.
- Walk through your routine. Take a pan from the hob to the sink, open the fridge, empty the dishwasher, and have someone pass behind you.
- Open every door and drawer in your mind and on the tape.
- Check the aisles. If you can’t stand with a door open and let someone pass, the aisle is too tight.
- Look at it in 3D. Our 3D visualization and walkthroughs let you see the layout with real dimensions before anything is ordered.
What Kitchen Layouts Cost
I won’t quote prices, because they swing too much with country, cabinetry quality, appliances and labour. What I can tell you is what drives the cost, since it explains why layouts differ.
The biggest factor is the length of cabinet runs: the more metres of units and worktop, the higher the bill. That’s why a one-wall kitchen is the cheapest and a U-shape or a kitchen with an island costs more. Next is services: moving the sink, drain, gas or electrics costs far more than swapping cabinet doors, and an island with a sink or hob adds trenching, ducting and ventilation. Then come worktops (stone is far pricier than laminate), appliances, corner and pull-out fittings and finishes.
Practical ways to save without hurting the result: keep the sink and hob where the services already are, choose standard cabinet sizes, spend more on drawers, hinges and worktops than on door fronts, and put the money into ventilation. Add 10 to 15 percent for surprises, particularly in older homes where walls and floors turn out uneven.
You can see how Archtra plans and details finished homes through the project pages, and our guide to architectural designs and what they cost explains how a brief becomes a plan and a budget.
If you’d like to see finished kitchens and how they sit in whole homes, there’s a wide range at https://archtra.com/our-portfolio/ to browse before you decide.
Mistakes I’d Steer You Away From
Choosing an island for a room that’s too small. Leaving less than 42 inches between counters. Putting the hob next to a door or at the end of a through-route. Forgetting landing space beside the hob, sink and fridge. Ignoring the blind corner. Picking a layout that needs the sink moved when it could stay put. Fitting a recirculating hood and cooking with a lot of oil. Letting the dishwasher door block the fridge. Placing the fridge so that opening it blocks the aisle. And designing for the ideal quiet weekend dinner, not for the 7 pm weekday rush when two people and a child are all in the room.
If you’re planning from another city, or for a home you can’t visit often, ask for a dimensioned plan with door swings drawn, and for a 3D view of the working areas, before you commit. Our relocation guide is useful if the kitchen is part of a bigger move.
Working With an Architect or Kitchen Designer
For a simple like-for-like kitchen, a good cabinet supplier can often draw it. If you’re moving walls, plumbing or gas, combining the kitchen with living space or planning a large island, a designer saves time and money by getting the plan, services and ventilation right at the start. You can contact the Archtra team, read about the studio, explore our services and interior architecture work, check the FAQ page or browse the blog.
Final Thoughts on Kitchen Layouts
Start with the room, not the picture. Measure the width, find the plumbing, count the cooks and think about how you really cook. In a narrow room, choose a one-wall or galley. In a medium room, an L or U. In a big room, add an island or peninsula, but only if you can keep 42 to 48 inches clear around it. Plan landing space, ventilation and corner storage before door styles. Good kitchen layouts don’t win on photographs. They win on the thousandth time you cook dinner.
Frequently Asked Questions About Kitchen Layouts
1. What is the most efficient kitchen layout?
For a single cook in a narrow room, the galley is among the most efficient, with everything within a step or two. For medium rooms, the L-shape is flexible and efficient, and the U-shape offers the most storage. The best layout is the one that fits your room, plumbing and cooking style.
2. How much space do I need between kitchen counters?
The NKBA recommends a work aisle of at least 42 inches (about 1,065 mm) for one cook and 48 inches (about 1,220 mm) for two or more, measured between counter fronts, tall units and appliances. A walkway that isn’t a work area can be 36 inches (915 mm).
3. What is the kitchen work triangle?
It’s the path between the sink, hob and fridge. NKBA guidance says each leg should be 4 to 9 feet (1.2 to 2.7 m) and the total no more than 26 feet (7.9 m), with major traffic not crossing it. It’s a planning guideline rather than a code, and works best for compact single-cook kitchens.
4. Is a galley kitchen a good layout?
Yes, for narrow rooms and single cooks. It’s compact and efficient, with plenty of counter space per square metre. The aisle should be 42 to 48 inches wide, and it works best if traffic doesn’t pass through it. A galley with one closed end is calmer than a through-route.
5. How big does a kitchen need to be for an island?
Roughly 12×12 feet (3.6×3.6 m) at a minimum, with at least 42 to 48 inches of clear aisle on every side of the island. If the room is smaller, consider a peninsula, which keeps the aisle clear on three sides and can recover about four feet of floor space compared with a freestanding island.
6. What is the difference between an L-shaped and a U-shaped kitchen?
An L-shape uses two adjoining walls and leaves the rest open, which suits open-plan rooms and later additions like an island. A U-shape wraps around three walls and gives the most storage and counter space, but feels enclosed in a small room and needs about 42 to 48 inches (or 60 for wheelchair access) between runs.
7. How do I deal with corner cabinets in L- and U-shaped kitchens?
Plan for them from the start with corner carousels, pull-out systems or angled drawers, since retrofitting is harder and costlier. Blind corners without these systems waste space and make items hard to reach.
8. Where should the hob go in a kitchen layout?
Away from doors and through-routes, with 300 to 400 mm of counter on each side, not directly beside the fridge, and with strong ventilation, preferably a hood that vents outside. In open-plan rooms or kitchens where you fry a lot, extraction is especially important.
9. What are the cheapest kitchen layouts to build?
One-wall and galley kitchens usually cost least because they have the shortest cabinet runs and the simplest services. Costs rise with the length of units, the use of stone worktops and especially with moving plumbing, gas or adding an island with a sink or hob.
10. How can I test a kitchen layout before ordering?
Mark every unit and appliance at full size on the floor with masking tape, use cardboard boxes for the fridge and oven, and walk through your cooking routine with a pan and someone passing behind you. Check every door and drawer opening, and review the plan in 3D if possible.