Fire-resistant home design has quietly moved from “nice to think about if you live near a forest” to something insurers, planners and buyers ask about in many parts of the world. Dry summers last longer, houses spread further into the edges of woodland and scrub, and the cost of getting it wrong is brutal. The part that surprises most people is how a house actually catches fire. It usually isn’t a wall of flame arriving at the front door. It’s embers: small, glowing pieces of burning material carried on the wind, landing in a gutter, a vent or a pile of bark mulch against the wall. This guide covers what resists that, from roofs and siding to the shape of the house, the space around it, the glass in it, and what all of it does for your insurance and long-term value.
What “Fire-Resistant” Actually Means (and What It Doesn’t)
Nothing is fireproof. A house exposed to a severe enough fire will fail. “Fire-resistant” means materials and details that slow ignition, resist embers and radiant heat, and give the house, and the people and firefighters around it, more time.
It helps to think in terms of three ways a fire reaches a home:
- Embers. Wind-blown burning fragments land on or inside the house. According to the Insurance Institute for Business & Home Safety (IBHS), embers are the leading cause of home ignition from wildfires.
- Radiant heat. Heat from a nearby fire cracks glass and ignites wall surfaces from a distance.
- Direct flame. Burning fuel touches the building, whether that’s a shrub against the wall or a wooden fence attached to the house.
Good design handles all three, but embers get most attention because they’re the most common route and the cheapest to defend against.
One more point before the details. Fire-resistant design isn’t only a wildfire topic. Most house fires start inside, from kitchens, electrics and heaters, and several of the same ideas (non-combustible finishes, compartments, sealed gaps) help there too. I’ll cover that near the end.
Start With the Site, Not the Siding
You can build the most resilient house in the world in a terrible spot, so look at the land first.
Slope matters more than anything, because fire runs uphill much faster than across flat ground. A house perched near the top of a steep slope, or at the head of a narrow valley where wind funnels, faces much greater exposure than one on gentle ground with a buffer below. Check which way the prevailing wind blows in the dry season, how far the nearest dense vegetation is, whether fire trucks can reach you on a road wide enough to turn around, and whether there’s a reliable water supply.
In the Himalayan foothills and other forested hill regions, seasonal forest fires are a regular fact of summer, and dry pine needles on the ground are very easy to ignite. The same logic applies in the Mediterranean, Australia, Canada, Chile and the western US: dry fuel, wind and slope decide the risk, whatever the country.
Also check what your local authority already requires. Some places map fire-prone areas and set minimum construction standards, and others leave it to the owner. Australia, for example, assesses each site against a Bushfire Attack Level and attaches construction rules to the result, which I’ll come back to.
Roofs, Vents, Gutters and Eaves: Where Embers Get In
If I could only have one section of this article read, it would be this one. Most ignitions happen at a handful of vulnerable points, and the fixes are surprisingly cheap compared with the cost of a new house.
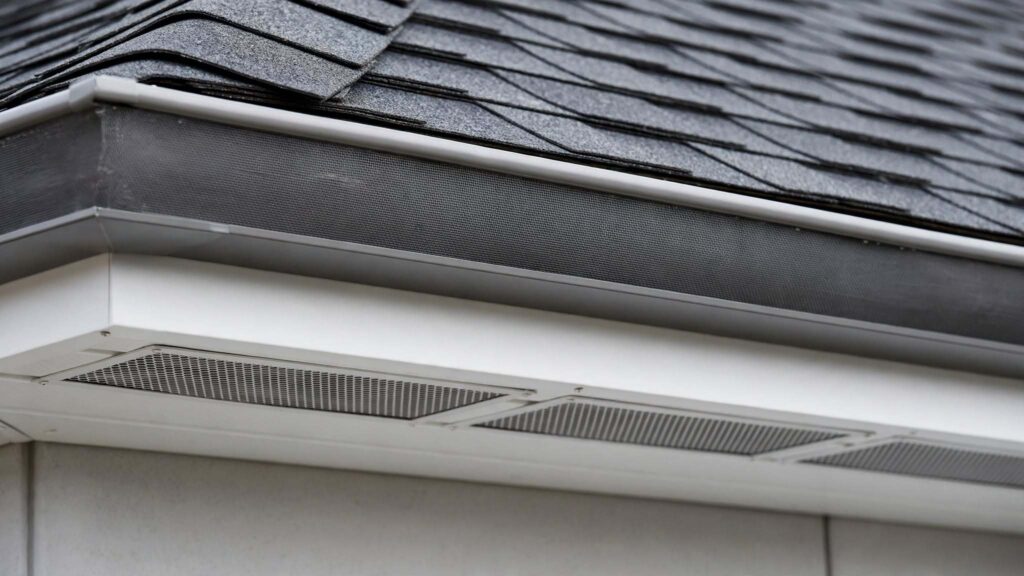
The roof. The roof is the biggest surface exposed to falling embers. In the US, a Class A fire-rated roof covering is the best available rating, and IBHS notes that most American homes already have one. Metal sheeting, clay tiles and concrete tiles generally perform well, and some asphalt shingle products achieve Class A with the right underlay. Untreated wood shakes are the classic weak point. Whatever you choose, details matter as much as the covering: seal the gaps where roof tiles meet the ridge and eaves, because embers find gaps.
Vents. Attic, roof and crawl-space vents are an open door for embers, and a spark that lands in an attic full of dry insulation and timber is a disaster you can’t see. IBHS specifies ember- and flame-resistant vents or metal mesh with openings no larger than 1/8 inch, around 3 mm. Australian guidance for openable windows goes finer, with mesh apertures under 2 mm. Don’t use plastic vent covers or fly screens, which melt.
Gutters. Gutters collect leaves and pine needles, which is ideal fuel for a landing ember. Use metal gutters, fit covers or guards, and clean them regularly. A noncombustible gutter full of dry leaves still burns, so maintenance counts.
Eaves and soffits. Open, boxed-in-with-timber eaves trap hot gases and embers. Enclosing the underside with non-combustible material (fibre-cement board, for instance) is a standard hardening step.
Chimneys and skylights. Fit a spark arrestor to any chimney, and treat skylights like windows, with toughened or fire-rated glass.
Walls and Siding: What Holds Up and What Doesn’t
Walls take radiant heat and flying embers, and a surprising number of fires start where the wall meets the ground.
IBHS’s baseline standard asks for at least six inches of non-combustible material at the bottom of exterior walls and decks, because embers pile up there and smoulder against the wall. Above that, the choice of cladding matters.
| Material | How it generally performs | Things to watch |
|---|---|---|
| Brick and masonry | Excellent, non-combustible and durable | Mortar joints, wall ties, timber backing behind |
| Stucco or cement render | Very good over a solid base | Cracks, combustible insulation or timber behind |
| Fibre-cement boards | Very good, non-combustible | Needs good detailing at joints and corners |
| Metal cladding (steel, aluminium, zinc) | Non-combustible, but conducts heat | Insulation and sheathing behind it still matter |
| Stone | Excellent | Weight, cost, what sits behind it |
| Treated or heavy timber | Moderate, chars slowly | Depends on species, thickness, treatment and local rules |
| Vinyl siding | Poor, melts and deforms | Avoid in high-risk zones |
| Untreated thin timber boards | Poor | Avoid near the ground and at the roof edge |
A word on “non-combustible” claims. The outer skin is only part of the wall. If there’s a combustible foam or timber frame behind it, a gap at a joint can let heat and embers in. Specifiers should look at the whole build-up: cladding, cavity, insulation, sheathing and frame. Our home soundproofing guide touches on this too, since sealing gaps and choosing insulation affects fire and noise at the same time.
Compact Massing: The Shape of the House Matters
This is the part people rarely think about, and it’s where an architect earns their fee.
Embers collect in corners, ledges and recesses. A house with lots of inside corners, small projecting bays, deep eaves, complicated roof valleys and balconies gives embers dozens of places to lodge and glow. A compact, simple form with a clean roof and few re-entrant corners has fewer traps.
Practical design moves that follow from this:
- Keep the footprint compact. A simple rectangle or L-shape has less exposed edge than a sprawling, stepped plan.
- Simplify the roof. Fewer valleys, fewer dormers, fewer places where roof meets wall. A simple gable or low-pitch roof is easier to protect and clean.
- Limit overhangs and projections. Deep open eaves, cantilevers and decks that project from the wall trap hot gases and embers. If you want shade, consider enclosed or non-combustible details.
- Think about decks and balconies. Timber decks attached to the house are one of the most common ways fire reaches the wall. Use non-combustible or wildfire-rated decking, enclose the underside, and keep the area beneath clear.
- Reduce nooks. Recessed entrances, tight courtyards and covered porches full of furniture and cushions hold fuel.
- Detach outbuildings. IBHS suggests keeping sheds and similar structures at least 10 feet from the main house, and give them their own cleared zone.
Compact massing also helps with energy use and cost, which is why it fits comfortably with sustainable design. Our architectural designs guide explains how plan shape, structure and budget interact.
Defensible Space: Designing the Ground Around the House
The area around a house is part of its fire design, and it’s usually described in zones.
| Zone | Distance | What to do |
|---|---|---|
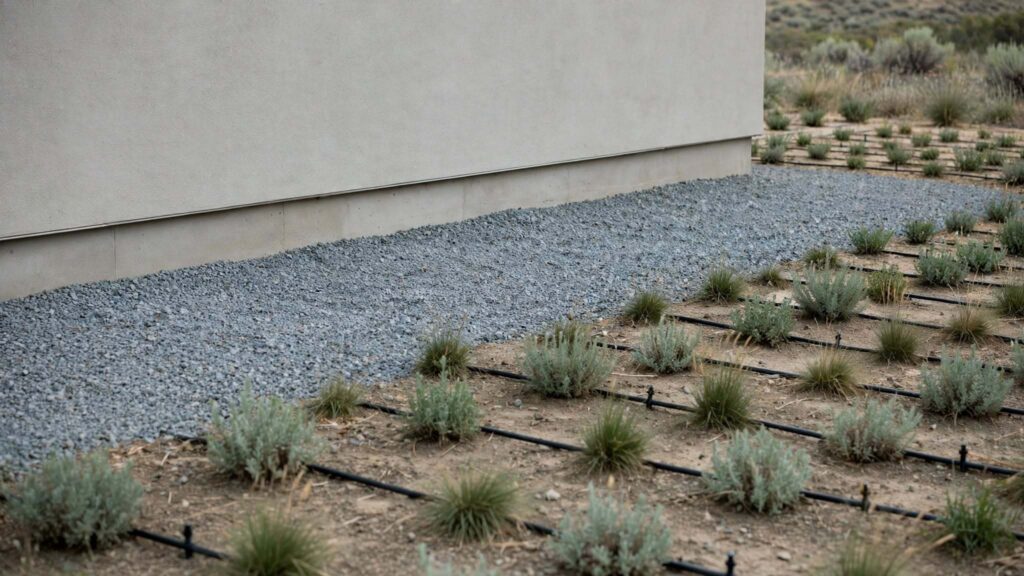
| Zone 0 (ember-resistant zone) | 0 to 5 ft (about 1.5 m) | Non-combustible only: gravel, pavers, concrete, bare soil. No bark mulch, no timber, no dry plants, no overhanging branches. Replace attached wooden fences. |
| Zone 1 | 5 to 30 ft (about 1.5 to 9 m) | Low, irrigated, well-spaced planting. Remove dead material. Break up continuous fuel. |
| Zone 2 | 30 to 100 ft (about 9 to 30 m) | Thin and space trees and shrubs, limb up lower branches, and remove ladder fuels. |
Zone 0 gets the most attention at the moment, and for good reason. IBHS’s CEO has summed it up bluntly: where we see a beautiful bush or wood mulch, an ember sees fuel. In a research burn and a real-world comparison, a home with cement pavers instead of bark mulch near its foundation survived where a neighbour with combustible material didn’t. Treat the first five feet as a plinth of stone and gravel around the house, and put your planting beyond it.
Other details people forget: propane tanks should sit well away from the house, woodpiles belong outside the inner zones, and wooden fences that connect to the house act like a fuse. IBHS asks for combustible fences within five feet to be replaced, and for back-to-back fencing to be removed within 30 feet in its higher tier.
Choose plants carefully. Low-moisture, resinous and oily species (many pines, junipers, eucalyptus) burn hot and fast, while irrigated, succulent or deciduous species tend to be safer. Local fire authorities usually publish plant lists, and they beat anything generic.
Windows, Doors and Fire-Rated Glazing
Glass is usually the weakest part of the wall. Radiant heat cracks it, and once it breaks, embers can enter the house and light furnishings inside.
Single-pane float glass is the most vulnerable. Toughened glass performs better, dual glazing better still, and fire-rated glass better again. The key is to use the right level for your site. Australian guidance from CSIRO sets out a rough ladder: standard annealed glass suits only the lowest bushfire attack level, toughened glass reaches around BAL-29, and fire-rated glass is needed for BAL-40, with non-combustible shutters on top for the flame zone.
In practical terms:
- Dual-pane tempered glass is a sensible baseline in fire-prone regions. IBHS’s higher tier asks for it, and California’s insurance framework recognises double-pane windows or shutters.
- Shutters and screens protect glass from radiant heat and embers. In Australia, bushfire shutters or metal mesh screens are common requirements for windows at higher BAL levels. Metal frames beat vinyl or untreated timber.
- Fire-rated glazing is tested for how many minutes it holds back flame and heat. It’s usually more expensive, so it’s worth reserving for the elevations that face the main threat.
- Size and placement. Large expanses of glass facing the fuel are the biggest risk. Think about where the views and the danger are, and put the biggest windows on the safest sides.
- Doors. Use solid-core or non-combustible doors, and fit good seals. If you’re planning a statement entrance, our pivot door guide covers material and weather decisions, and the same principle applies: check the fire performance of the whole assembly, not just the face.
- Garage doors. They have gaps at the sides and bottom where embers get in. Weather seals help.
Insurance and Long-Term Value
This is where design meets money, and where things are changing quickly.
In several wildfire-exposed places, insurers have raised premiums, restricted coverage or left certain areas altogether. Regulators and industry bodies have responded by tying cover and discounts to specific hardening measures. California’s Safer from Wildfires framework, for example, requires insurers to take recognised mitigation into account in pricing, and lists actions that qualify for a discount: a Class A roof, a five-foot ember-resistant zone, a non-combustible lower six inches on walls, ember- and fire-resistant vents, double-pane windows or shutters, and more.
IBHS runs a separate Wildfire Prepared Home programme. A baseline designation covers a Class A roof, a non-combustible five-foot zone, six inches of non-combustible wall base, ember-resistant vents, a cleared 30-foot perimeter and clean gutters and decks. A higher tier adds dual-pane tempered windows, non-combustible siding, doors and shutters, enclosed eaves, covered gutters and removing back-to-back fencing. A designation lasts three years and needs an annual landscape check, which keeps the maintenance honest.
What does it mean for value?
- Insurability. In a tightening market, a documented, hardened home is easier to place and may qualify for discounts. That’s often the biggest practical benefit.
- Resale. Buyers and lenders are increasingly aware of fire risk. A home with a clear record of upgrades, receipts and certificates reads as lower risk than one without. Whether it adds to the price depends on your market, so treat it as a likely advantage, not a guaranteed return.
- Survival. The real return is the house still standing.
A few honest cautions. Rules and discounts vary by state and country and change often. Insurers don’t all treat hardening the same way. Keep photographs and invoices as you work, and ask your insurer or broker what they recognise before you spend. Don’t assume a certificate will fix a high-risk location.
Inside the House: Fire Safety That Isn’t About Wildfire
The same design instincts help with the more common problem, a fire that starts indoors. Smoke alarms on every level and in every sleeping area, interlinked where possible, are the single cheapest piece of protection. Sprinklers, where they’re available and affordable, change outcomes dramatically. Fire-rated doors and compartmented rooms slow spread and protect escape routes. Keep an escape path that doesn’t pass through the kitchen, and check wiring, heaters and chargers.
In flats and attached houses, fire-stopping around pipes, cables and recessed lights matters just as much as it does for sound. If you’re building new walls and ceilings, pay attention to the fire rating of linings and the sealing of gaps. Interior timber details such as ceilings and joinery can add fuel, so see our ceiling design guide on how to use timber thoughtfully, and use rated materials where required.
What Fire-Resistant Home Design Costs
I’m not going to quote figures here, because costs depend on country, house size, local labour and which materials you choose, and published numbers vary enormously. What I can give you is the order of things.
The cheapest, highest-impact work is also the least glamorous: ember-resistant vent covers, metal gutter guards, clearing the first five feet, removing combustible mulch and fences, and keeping roof and gutters clean. After that come mid-range upgrades such as non-combustible siding, enclosed eaves, better windows and shutters. The big spends are a new roof covering, replacing a timber deck, re-cladding and a full rebuild. In Australia, official guidance notes that glass and windows get more expensive at the higher BAL ratings, so thinking carefully about where glass goes in the design saves money.
For new builds, the cheapest time to harden a house is at the drawing stage. Choosing a compact form, non-combustible cladding and the right glazing from the start adds far less than bolting it on later. For retrofits, rank the work by risk and cost: fix the vents, gutters and Zone 0 first, then work outward.
Add 10 to 15 percent for surprises, especially in older houses where you find hidden gaps, combustible framing or rotten fascias once panels come off. You can see how Archtra plans and details finished projects through the project pages, and a wider range of finished buildings is shown at https://archtra.com/our-portfolio/ if you’d like to browse before deciding.
Mistakes I’d Steer You Away From
Spending on a premium cladding and leaving plastic vents and a timber deck in place. Ignoring Zone 0, because it looks less pretty without planting. Choosing a complicated roof and then discovering no one can clean the valleys. Attaching a wooden fence or pergola to the house. Fitting beautiful floor-to-ceiling glass facing the fuel side. Forgetting maintenance, since a hardened home with a gutter full of dry leaves is a soft target. Assuming a certificate will lower premiums without asking the insurer. And treating all this as a one-off project instead of a habit.
If you’re designing a house from another city, or buying a home in a fire-prone area you can’t visit often, get the site’s fire-risk assessment, the construction specification and photographs of each stage in writing. Our 3D visualization and walkthroughs help you check massing, glazing and layout before anything is built, and our relocation guide is a useful companion if you’re moving to a new region and want to understand its risks.
Working With an Architect on Fire-Resistant Design
You can do a lot yourself, such as clearing the first five feet, replacing vent covers, cleaning gutters and removing combustible fences. For a new build, a major renovation or a house in a high-risk area, involve an architect early, together with a local fire authority or bushfire consultant where one exists, because shape, material, glazing and site layout are all linked. You can contact the Archtra team, read about the studio, explore our services and interior architecture work, check the FAQ page or browse the blog.
Final Thoughts on Fire-Resistant Home Design
Defend against embers first: roof, vents, gutters, eaves and the first five feet. Choose non-combustible walls and the right glass for your site. Keep the form compact and simple, with fewer places for embers to land. Keep the ground around the house honest and maintained. And talk to your insurer before you spend. Fire-resistant home design isn’t a single product or a single wall. It’s a system of small, boring details that work together, and when they do, a house has a far better chance of standing when everything around it burns.
Frequently Asked Questions About Fire-Resistant Home Design
1. What is fire-resistant home design?
It’s designing a house with materials, shapes and details that resist ignition from embers, radiant heat and flame. That includes non-combustible roofing and siding, ember-resistant vents, protected eaves, tougher glazing, a compact form and a cleared zone around the building. Nothing is truly fireproof, so the goal is to slow ignition and buy time.
2. What is the best material for a fire-resistant house?
Non-combustible materials such as brick, masonry, stone, fibre-cement, stucco or render, and metal cladding perform best, with a Class A roof such as metal or tile. But the whole assembly matters: combustible insulation or timber behind the cladding, and gaps at joints, can undo a good outer layer.
3. How do embers ignite a home?
Wind-blown burning fragments land on roofs, in gutters, on decks, in vents or against walls and smoulder in combustible material, such as dry leaves or bark mulch. They can also enter through open vents or broken glass. IBHS identifies embers as the leading cause of home ignition in wildfires.
4. What is defensible space, and how big should it be?
Defensible space is managed land around a home that slows fire and reduces ignition. A common model uses zones: a non-combustible Zone 0 from 0 to 5 feet, a lean and irrigated Zone 1 out to about 30 feet, and a thinned Zone 2 farther out. Local rules vary, so check your fire authority.
5. What size mesh should ember-resistant vents have?
IBHS specifies ember- and flame-resistant vents or metal mesh with openings of no more than 1/8 inch (about 3 mm). Australian guidance for window screens uses even finer mesh, under 2 mm. Avoid plastic covers, which can melt, and check the standard that applies where you live.
6. Do I need fire-rated windows?
Not always. Many fire-prone sites need dual-pane tempered glass, shutters or metal screens, while the highest-risk sites require fire-rated glass. Australia’s rules tie glazing to the Bushfire Attack Level. Put the strongest glazing on the sides facing the most fuel and use smaller openings there.
7. Does a fire-resistant home lower insurance costs?
It can. In California, the Safer from Wildfires framework lists measures such as a Class A roof, a five-foot ember-resistant zone, ember-resistant vents and double-pane windows that qualify for discounts. Rules differ by place and insurer, so ask yours what they recognise and keep records of the work.
8. Does compact house shape really make a difference?
Yes. Embers collect in corners, ledges, valleys, deep eaves and under decks. A simple, compact form with a clean roof gives them fewer places to lodge and is easier to clean and protect. It’s also usually more energy-efficient and cheaper to build.
9. Is a metal roof the best choice?
Metal roofing generally performs very well and is often rated Class A, as are tile roofs. The covering is only part of the system, though. Gaps at the ridge and eaves, open vents and gutters full of debris can still let a fire in, so details and maintenance matter as much as the material.
10. Does fire-resistant design add value to a home?
Often, but it varies. A hardened home is easier to insure and reads as lower risk to buyers and lenders, especially with documentation. However, price effects differ by market, and you shouldn’t count on a guaranteed return. The strongest benefit is better protection and more reliable insurance.